CLICK HERE FOR FREE BLOG LAYOUTS, LINK BUTTONS AND MORE! »

Monday, January 30, 2012

DIY Cupcake Wrappers

Hello, friends,
Welcome to another new week.  (One week closer to spring! yea!)  Many friends are emailing about the handmade cupcake wrappers.  They are very simple and can be made out of any paper print or solid that you love.  I found so many DIY tutorials for this, I really didn't see the need for me to try to do a decent tutorial for you.  This is one that I enjoyed.  I found this at:  http://gramkinpaperstudio.blogspot.com/2010/09/make-your-own-cupcake-wrappera-tutorial.html .
We love our sweets...especially cupcakes. So for those of you who like to dress up your cupcakes with pretty wrappers, you can know make your own.
This tutorial is brought to you by Judy in Her Natural Element. She also has great recipes , especially cupcakes for you to try.
We suggest the Candied Sweet Potato with Mascarpone Frosting or the Grace Cupcakes.
Note: These use patterned paper, but you can personalize your own for a party, birthday or etc just by designing and printing out pattern on heavy cardstock. Just remember to extend design (bleed if all over patter like pic) past edges of template to make sure when you cut you don't cut off design.
I wondered if I could just make some myself...


I had a bunch of scrap-booking paper and materials, so I brought them out and started to experiment! I had paper of all kinds, rhinestone stickers, double sided tape, and craft scissors that produce cute scalloped edges!


First, I carefully disassembled a cupcake liner, and then taped it down to a sheet of paper to create a pattern/cut-out. But unfortunately, this didn't actually work. The angle of the arch was off. You have to make the "rainbow" shape slightly wider. So I ended up starting over. As it turns out, it required lot of trial and error.. but I was finally able to trim the perfect "rainbow" shaped pattern that would give me a great cupcake wrapper!


Then, the fun began! I created a ton of different wrappers by tracing and cutting out the "rainbow" design on different patterned paper.


I stamped some...


...and others I embellished with rhinestones!


A few hours later, I had a whole stack of them!

I was super tired that day and didn't have the time/energy to bake a batch of cupcakes for the Cupcake Wrapper Photoshoot, so I ran out to Whole Foods to purchase some. Thus, the cupcakes you're about to see are not actually made by me. They're still super pretty and they were great models for my wrappers! Not to mention, they were super tasty, too! =)


Cherry blossom gift wrapping paper.


Cute polka dots with rhinestones.

More with rhinestones!


Pretty green ones with textured paper.


Plain green ones with flower & rhinestone embellishments.


Aren't they fantastic? They turned out better than I could have imagined! And all it took was some imagination and persistence!
                          %%%%%%%%%%%%
We thank you Judy for letting us use your tutorial.  I hope you find this useful. 
Happy Monday!!
                             ***********
Today's Tidbit

Keep your thoughts positive because your thoughts become your words.
Keep your words positive because your words become your behavior.
Keep your behavior positive because your behavior becomes your habits.
Keep your habits positive because your habits become your values.
Keep your values positive because your values become your destiny.
                            
                             ************
                        

Tuesday, January 24, 2012

Hard Boiled Eggs

Hi, everyone.  I hope you had a nice weekend.  Boy, the weather sure left its footprints in lots of places, especially in the south.  Our prayers are with the families that were affected by these sneaky storms. 
How many different ways have you heard to make hard-boiled eggs?  A plenty, I am sure.  But, I was jumping around on Pinterest this weekend and momonamission.me  had listed  her special trick for hard-boiled eggs.  Have you seen it?

Here is the world’s easiest way to make boiled eggs:

1. Fill a pot with water and set the temp to high. Add desired amount of eggs making sure the water covers the entire egg. Bring it to a boil. DON”T CONTINUE TO BOIL. Once it begins, remove it from the heat and put a lid on it. Set your timer for 15 minutes.
2. Ding! Pour the hot water off and immediately fill your pot with cold water. Add as much ice as you can to this water. If it melts in a few minutes, add more. The water should be icy cold when you put your hand in it. If not, continue adding ice.
3. After about 10-15 minutes (no set time), pour NEARLY all of the water off reserving about an inch.
4. Put the lid on and now it’s time to play bumper cars. You heard me, shake those babies bumping them together back and forth. You’ll look ridiculous, but I promise it’s worth the goofy look so you’re not peeling each one under cold running water. Just continue to shake, shake, shake for about a minute and voila! When you remove the lid nearly all of your shell has fallen off the egg and they EASILY peel off without peeling the egg off.
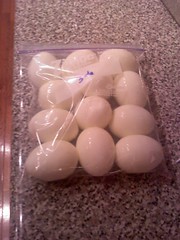
0307011911.jpg
There that’s my method of boiled eggs. I store them in a ziploc bag (dated-because they have a week long shelf-life) in the fridge and I’ve saved myself time, energy and money (because I didn’t buy the boiled eggs in a bag sold at the store). And my boys are happy all week long. I add them to my chef salad or eat them as a protein snack.
P.S. If you’re making deviled eggs, whip your yolk with your wire whisk in your mixer. And whisk a long time and add a tablespoon or two extra mayo and top it with a sliced olive with pimento. All your in-laws will think you’ve went to culinary school!
                           ****

Now doesn't that sound easy?  I hate when the whites stick to the shell when you are peeling, it doesn't make for a very pretty deviled egg.  lol.  Has anyone used this method before?  I would love to know if you, too, had good luck with this method.  I will be trying this out real soon.
                          ***********

Today's Tidbit
    Good ideas often transform into great ones if you give them enough room to play.

                          *****************

Monday, January 16, 2012

Brrrrrrr....

Hi, friends.  How are you?  I am sitting here listening to it sleet on my window.  I am warm but just the sound gives me goosebumps!  Thinking of sleet always reminds me of my dear mother, my ultimate
'Scrabble' mate, that years ago came up with the word 'sneet'.  The point of whether or not it is a word is not even important but it is always good for a laugh each winter when one of us gets to say that it is 'sneeting'.  Of course,  for anyone who wants to know, we say it is a combo of snowing and sleeting.  Makes sense doesn't it?  Has anyone ever heard a meteorologist use that word?  I would love to know.

I want to say 'Hello, welcome aboard' to our new friends that have joined us.  Feel free to jump in and give us your thoughts on anything - anytime.  I would love to have more interaction or conversations between all of us.  I dislike that we call each other 'followers'.  It makes it sound like a cult or secret circle of some such that we are joining.  I prefer friends, that's a nice word.  lol. 

We haven't looked in on my Pinterest boards lately.  How many of you have started some Pinterest boards.  I am hooked!  Hear are some of my latest pins....enjoy....

Isn't this great?!


A good winter shoe/boot!


From this......

...........To this.


Such pretty, soft colors.


          Then last, but not least........              


I think I can fly....


I hope this gives you a start to a good week.  Have fun and invite your
friends over.    
Later gator.

******Today's Tidbit**********

Each little flower that opens, each little bird that sings, God made their glowing colors, he made their tiny wings.
                               ******Cecil Frances Alexander*****


Sunday, January 8, 2012

New TuTus Listed

Hi, friends,
I'm just poppin' in for a minute to let you know that I have just listed 2 new tutus.  These two are really cute!  One is solid white, super fluffy with braids and bows that are dressed up with white ribbons and red hearts. The other one is red and white. Again, super fluffy with darling ribbons that have red hearts on them.  Although, hearts are year-round decor, these tutus could also be for Valentines Day.  Can you imagine how happy any little girl would be to get a tutu that somehow magically turns them instantly into a princess or a fairy? Check these and other things in my shop at
http://www.etsy.com/shop/Specialhandmadegifts .  Here is a peek at the tutus that I just listed:


Gotta run, see ya again in a day or two.  Hope that you are having a great weekend.    ♥♥♥

Thursday, January 5, 2012

DIY Curly-Q Wreath

Hi, y'all.  I must have a new addiction, I love all the wreath ideas that I have been seeing.  I am crazy about one that I make that uses only 3 boas and a styrofoam circle.  How hard is that sounding?  This next one sounds easy, too.  I will see.
I first saw this one a couple of weeks ago.  I love it.  Different color combos could be used for different holidays or even a birthday.  I ran across the instructions already written out, so , I am borrowing these from Embellished Bayou. I think that this is super.
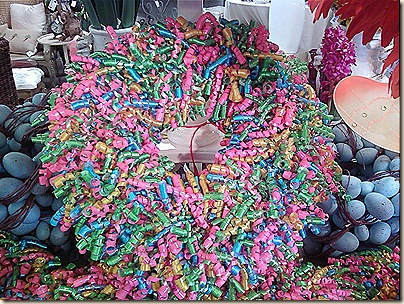
                                                                    Here is the store’s version, retailing for $25.00:

0225101344-01


Like it?? I LOVE IT!
 
Here's how she did it. She started with an extruded wreath bought at Michael's with a coupon, so  it was less than $2.00.  If you’re lucky, your dollar store might have these, but hers didn't.


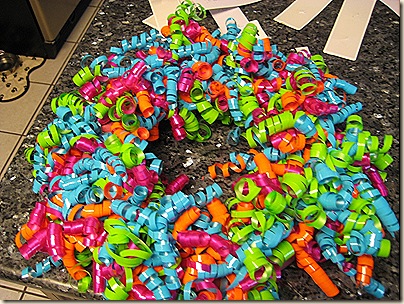
She spray painted the wreath pink in case any of  it showed through the ribbons and because she would be hanging it on a glass door and the back would be visible.  She also bought seven 3-packs of curly ribbon bows at the dollar store.  You’ll also need a staple gun and/or hot glue gun. Staple one bow on the wreath in the middle of the ribbon. Layer on another bow, criss-cross it on the top  of the first one. 
Keep doing this all the way around the wreath, pressing in the staples where needed.  Now, she found that the staples wouldn’t stay in, so she secured the ribbon with hot glue.  Depending on what kind of styrofoam wreath you have and how long your staples are, you may or may not need to do this.
IMG_0258
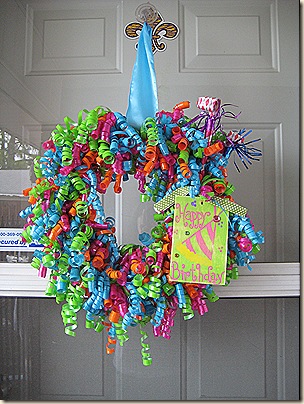
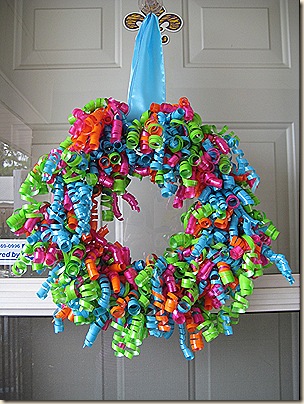
Fluff the ribbons and you’re done! She hung hers from a coordinating satin ribbon. 
IMG_0279

                           
IMG_0261
I think that the only thing that I would do different is that I would make my own bows instead of purchasing them.  Isn't this GREAT? 


                   ******************************
Today's Tidbit

                           Today

Today I will try to live through this day only and not tackle my whole lifes problems at once.
  Today I will be happy.  Most people are just as happy as they make up their minds to be.
Today I will be agreeable, I will speak softly, look my best, be kind and considerate, neither critisizing nor finding fault with anyone but myself.
  Today I will be careful of my tongue, if I cannot find something   fine to say, I will be silent, for the spoken word no matter how much regretted can never be recalled.
Today I will keep smiling.  It takes only 7 muscles to smile but
 84 to frown.
  Today everything I do will be done to the best of my ability  It   may not and probably will not be the best that it can be done, but it will be my best.
------Author Unknown-----